
|Title |Introduction |Integrating App's |Integrity Maintenance |AOODB Model |Backward Propagation |HVC |Constraint Maintenance |Conclusion |References|
7 Constraint Management in an Engineering Design System
Several features including management of complex design objects, version control, and automatic verification of engineering constraints are now appearing in engineering design systems. The verification of engineering constraints accounts for a major part for designing complex products such as automobiles and airplanes, especially when flexibility and product development time are critical requirements. This chapter presents a prototypic engineering constraint management system for control panel design, which implements the framework proposed in this thesis as well as the CONSTRAINTCCH constructor for the backward propagation. The prototype system can manage the design objects along with their constraints in the AOODBS, and integrate heterogeneous applications by enabling them to share the objects and the constraints. The integration based on the proposed system, therefore, greatly reduces the cost of constraint management in the applications during the design process.
This chapter is organized as follows. In Section 7.1, we describe a prototypic constraint management system for panel design, which employs the proposed framework and the CONSTRAINTCCH constructor. Section 7.2 presents an example of control panel design by using the proposed constraint management system. The section also shows applications participating in the design process can be integrated at the semantic level within the proposed constraint management system.
7.1 A Design Constraint Management System
7.1.1 Architecture
The proposed prototype of the constraint management system is schematically illustrated in Figure 7-1. The system consists mainly of three subsystems, the Interactive Constraint Administration (ICA) system, the design database, and the solid modeler, and various applications for engineering design.
The ICA system
The front end of the subsystem is a user interface that has a form of a command interpreter. The user manipulates design objects and engineering constraints through both the user interface and the solid modeler that will be described below. The main system of the ICA system consists of three sub-modules. The first module, the constraint management sub-module manages design constraints that verify the properties of design objects. Since constraints are built from database resources such as virtual classes, triggers, and methods, the module manipulates constraints using these resources. We will elaborate the mechanism and functionality of the module in Section 7.1.3.
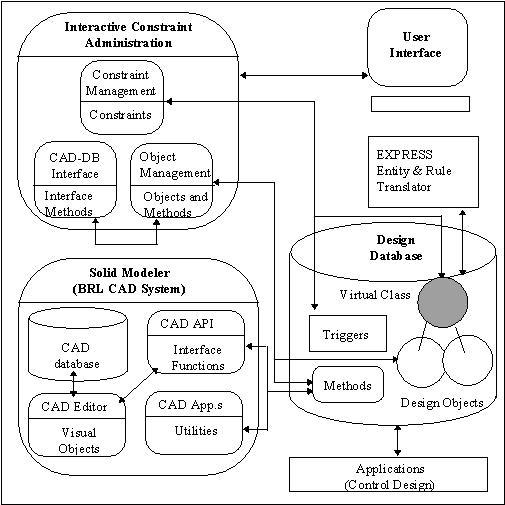
Figure 7-1 Architecture of the design constraint management system
The second sub-module, the object management sub-module, manages design objects and their methods. Design objects contain information about control panel design including the location, size, property, feature, and functionality of controls and displays. The module also provides a set of methods applicable to current design objects.
The third sub-module, the CAD-Database interface sub-module, enables the user to exchange the feature information of a design object between the design database and the solid modeler. The object is represented by the Constructive Solid Geometry (CSG) model [Mant88]. The module applies the CAD-Database interface methods with proper parameters to a design object to exchange its feature information. In the user's view, the module is a part of the object management sub-module in that the exchange operations are applications of special methods for the exchange (applications of the 'Import()' and 'Export()' methods) to a certain design object.
The design database
The design database stores design objects as instances of classes and their engineering constraints using virtual classes, triggers, and associated methods. Triggers check a transaction that transits objects into an inconsistent state. Virtual classes represent design constraints and support the backward propagation. The associated methods calculate a property (e.g., weight of design objects) on which a constraint is specified. The database also stores methods for general management, visualization, and engineering calculation. We employ a commercial AOODBS, UniSQL/X [UniS93a], to build the design database.
The solid modeler
The third sub-system, the solid modeler, enables the user to design feature of a design object with the CSG model. We employ the BRL CAD [BRL91a] as the modeler, since the pure CSG model in the solid modeler can be properly specified by the object-oriented class schema provided by the AOODBS. The solid modeler also plays a role of a visual browser of design objects in the design database. The 'Draw()' method extracts the feature information of an object from the database and draws it through the editor. The BRL CAD system also provides a library of interface functions and various utilities for manipulation of solid models. We use the library to develop the CAD-DB interface (e.g., the 'Import()' and 'Export()' methods) and utilities to build methods for design objects.
Various applications for engineering design
Various engineering design tools (applications) may share objects and constraints stored in the design database. An example of these applications, an application for control panel design, is depicted in the lower right corner of Figure 7-1.
7.1.2 Schema of the Design Database and Its Extension
Schema of the Design Database
A database schema is developed to capture fundamental data required to design control panels. Figure 7-2 shows the database schema described in the OMT notation. It includes the panels, displays, controls and feature information.
The 'panel' class contains two dimensional objects on which controls and displays are placed. The 'control' class describes objects such as buttons, switches, and selectors. Its subclass hierarchy shows the taxonomy of the controls. In the subclass schema, the intermediate classes such as the 'discrete_rotary_control' and 'continuos_linear_control' classes are provided for the purpose of the representation of the taxonomy. The leaf classes such as the 'push_button' and 'rocker_switch' classes describe the real controls.
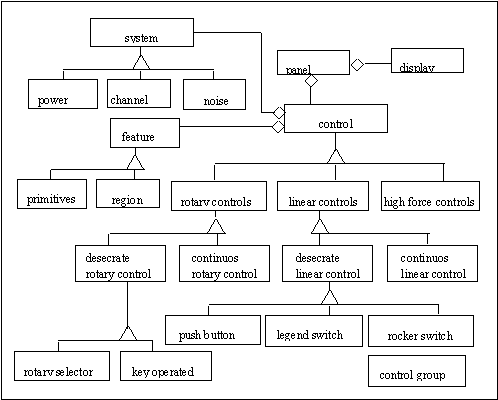
Figure 7-2 Schema of the design database
Each 'control' class contains information about its dimension, feature, location, and target systems it controls. For example, the 'rocker_switch' class is defined as follows:.
CREATE CLASS rocker_switch
AS SUBCLASS OF discrete_linear_control
( height float, width float, length float
angle float, location point,
caption string, resist float,
belong system, shape feature);
The 'height', 'width', 'length', and 'angle' attributes present the dimension of a control. The 'location' attribute presents the two dimensional point on the panel where the control is placed. The 'belong' and 'shape' attributes describe the target system and the feature of a control. Most controls have attributes similar to those of the 'rocker_switch' class.
The 'system' class and its sub classes describe the target system that is controlled by a control. It can be classified into sub systems such as the power system and the channel selection system, and used to check the constraints on grouping controls.
The 'control_group' class presents a set of controls in a limited area, which have a same target system. We provide the class to manage controls that can interfere others in a group of controls, when it is operated. The following is the detailed structure of the 'control_group' class.
CREATE CLASS control_group
( caption STRING,
elements set_of(control) )
Method CalDistance() Float;
The 'CalDistance()'method is used in checking the distance between controls (the clearance).
The 'feature' class, the super class of the 'region' and 'primitive' classes, presents feature information of the 'control' class. To store the 'feature' objects translated from the BRL CAD system, the sub classes are specially designed. The 'Region' class represents a node of a CSG tree in the solid model. The 'box' and 'RCC' classes represent the box and the Right Circular Cylinder (RCC) primitives in the BRL CAD system. We limit the primitives to only the BOX and RCC, for simplicity's sake.
The Schema Extension
The constraint management system initially provides a generic database schema for manipulating information of control panel. The user can extend the schema for his/her purpose. The extended schema is generated as the sub class of any class in the database. The system enables the user to specify the extended schema in the simplified ISO STEP EXPRESS language [ISO91;Do96]. The user can import entity definition for the schema and insert it into the database through a preprocessor. The preprocessor translates the EXPRESS specification into specification in the AOODBS's data definition language. Moreover, the system allows the user to specify the EXPRESS rules [ISO91] such as the unique rules or the local rules (the Rule is not supported) along with the entity definition. These rules can be used as integrity constraints that limit properties of a class. For more information about the translation, preprocessor, and EXPRESS rules, see [Do96].
As an example, if the user wants to manage information on a push button that is a kind of the discrete linear control, the schema should be extended using the following EXPRESS entity definition.
ENTITY push_button
SUBTYPE OF discrete_linear_control;
diameter NUMBER; /* or length */
resist NUMBER; belong SYSTEM ;
WHERE diameter > 8 AND diameter < 28;
END_ENTITY;
The specification shows that the extended schema uses the existing class, the 'discrete_linear_control' class (see Figure 7-2) to represent its information. Since the extended class (entity) is a kind of the discrete linear control, it is specified as a subclass of the 'discrete_linear_control' class. If a class to be extended is a kind of other class, it should be defined as a subclass of the class. The local rule, the where clause [ISO91], is also defined in the entity definition. This will verify the value of the 'diameter' attribute. The next specification is the translated schema and trigger from the above specification.
CREATE CLASS push_button
AS SUBCLASS OF discrete_linear_control;
(diameter REAL,
resist REAL, belong system);
CREATE TRIGGER trigger_1
AFTER UPDATE ON push_button
IF NOT(obj.diameter >8 AND obj.diameter <28)
EXECUTE INVALIDATE TRANSACTION;
Initially we extend the 'rocker_switch' and 'push_button' classes as sub classes of the 'discrete_linear_control' class to present the example control panel (see Figure 7-3 in Section 7.2.2).
7.1.3 Verification and Management of Design Constraints
The constraint management module in the ICA system provides a constructor for integrity enforcement. It enables the user to specify a design constraint that supports the backward propagation. We use the syntax of CONSTRAINTCCH in Section 6.3 for the constructor. Here, we eliminate the superscript, CCH, from the syntax and add the constraint_name for the management purpose. The following is the syntax of the constructor:
<constraint_constructor>::=
CONSTRAINT <constaint_name> ON
<initial_class>,
<participating_classes>  AS <condition>;
The initial_class, the participating_classes, and the condition in the syntax and those in the CONSTRAINTCCH in Section 6.3 are identical. The CONSTRAINT constructor can specify only the constraints over classes that form a class composition hierarchy. The other constraints can be specified with general triggers or the rules in EXPRESS.
To support user-specified integrity constraints, the constraint management sub module translates the constraints specified by the CONSTRAINT constructor to the virtual class (the HVC) and triggers for constraint enforcement. The translation is based on the procedure described in Section 6.3. The HVC and triggers enforce integrity constraint, supporting the backward propagation. The backward propagation is implemented based on the approach illustrated in Section 5.3.3, the backward propagation with virtual class.
To manage the user-defined integrity constraints, we employ the HVC as the unit of constraint management which includes creation, update, deletion, and conflict resolution of constraints. The HVC as the management unit gives two advantages in management and representation of constraints.
First, it is possible for the applications to manage the constraints without additional facilities. Since only database resources are used to construct and mange the HVC, the application can manage constraints without additional facilities such as a special purpose application for constraint management.
The second advantage is that integrity constraints are efficiently represented. The HVC has the least but enough information for representing the constraints. A HVC can be viewed as an abstract data type [Aho83] representing an integrity constraint with participating object through the object identifiers (the data) and methods derived from a base class (the operation). It, however, has no physical contents of the objects or the method. They are logically derived from existing objects and methods. The HVC, therefore, can represent the constraint efficiently, without duplication of the data and procedure for the constraint.
7.2 An Illustrative example : An Example of Control Panel Design
7.2.1 Design of A Control Panel
The example in this section illustrates how the proposed constraint management system supports several design constraints from [ADD94] during design of a control panel. When designing a control panel it is hard for the designer to consider all the constraints on controls such as the dimension, color, and coding constraints specified in the ergonomic design guidelines. Existing general applications including CAD systems rarely support these kinds of constraints. Without the constraint management system, the designer must make sure that numerous ergonomic constraints in the guidelines are satisfied. It will be very time-consuming, especially when the designer is not familiar with the ergonomic design. Compared with other systems that support only design data without its constraints, the constraint management system provides data with its constraints concerning ergonomic design so that heterogeneous applications may share the data and constraints and be integrated at the semantic level as mentioned in Section 1.2.
7.2.2 Product Definition
The front control panel of a radio set, shown in Figure 7-3, has two push buttons for channel selection, a rocker switch for on/off operations, and a display.
The design of the control panel is presented in the database as a set of objects, using the database schema in Figure 7-2. Figure 7-4 shows the object diagram of the control panel. The 'panel' object named 'radio_panel' references the 'control' and 'display' objects that contain information about their dimension and location. The group of push buttons for channel selection
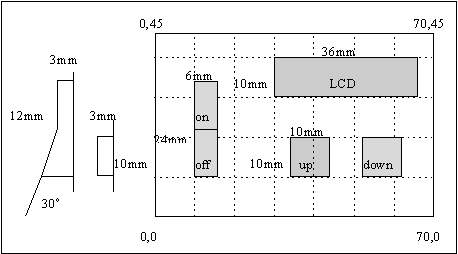
Figure 7-3 Front control panel of a radio set
is presented with the 'control_group' class for the purpose of checking the distance between buttons. The 'control_group' objects have participating
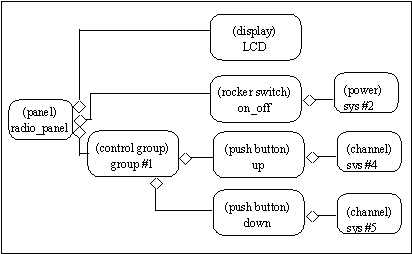
Figure 7-4 Object and class diagram for the control panel
'push_button' objects in their class composition hierarchy. The 'system' objects shows the control's target system. For example, the 'on_off' object in the 'rocker_switch' class controls the power system of the radio set.
7.2.3 Constraints on Controls
Kinds of Constraints
We consider four types of constraints on controls concerning ergonomic designs, and illustrate how they are applied to the control panel design.
The constraints limit dimension of a control. For example, the rocker switch has dimensional constraints that its length and width are larger than 12 mm and 6mm, respectively. Other kinds of controls, such as the push button, also have similar constraints on their dimension (see Figure 7-5).
To avoid interference in operations, the constraints are applied to a set of controls. For example, two push buttons that have the up and down functions
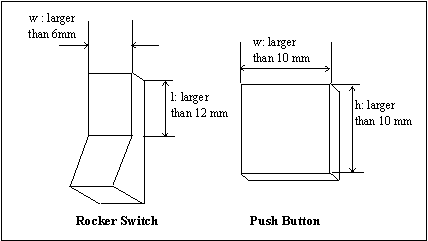
Figure 7-5 Dimensional constraints on a control
in the channel selection should be separated with a distance that is larger than 18mm (see Figure 7-6).
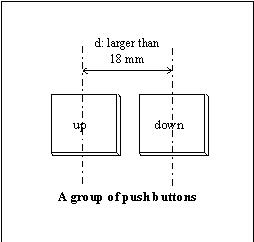
Figure 7-6 A dimensional constraint between controls
The constraints on grouping controls enforce a set of controls in an area to have a same target system to control. For example, a control among weapon control system, which controls the fuel system, should be relocated to near the controls concerning the fuel system. The group of controls in the example has two push buttons that control the same target system, the channel selection system of the radio set.
There are many ergonomic constraints that can not be specified with mathematical or symbolic expressions. In this case, design guidelines can support the designer to select proper designs that satisfy the ergonomic constraints. In the example, if the designer changes the Liquid Crystal Display (LCD) on the panel, the following guideline can be supported:
'If the artifact is operated under weak illumination, consider a back light in the display'.
Constraint Specification
We will describe how to specify the four kinds of constraints in the design database. The constraints on a control and constraints on grouping controls are specified with triggers in the database, and the constraints among controls are specified with the CONSTRAINT constructors introduced in Section 7.1.3. In addition, the design guidelines are specified and supported by the automatic invocation of procedures that is supported by the general triggers. The followings are the specifications of constraints on the example control panel shown in Figure 7-3.
1 ) A dimensional constraint on a control
The following trigger specifies the constraint on the push button in the example.
CREATE TRIGGER push_button_cons
AFTER UPDATE ON push_button
IF NOT(obj.length >= 10 AND obj.width >= 10)
EXECUTE INVALIDATE TRANSACTION;
The trigger states that if either length or width of the currently updated 'push_button' object is less than 10mm, the update transaction must be invalidated. Since the trigger checks every update on the 'push_button' class, the constraint on the push button will be automatically enforced. The same approach can be applied to the case of the rocker switch.
2 ) A dimensional constraint among controls
In the group of controls in the control panel example, each push button should be separated at a distance that is larger than 18mm and less than 36mm. To calculate and to check the distance, we provide the 'control_group' class and the 'CalDistance()' method. The 'control_group' class has a class composition hierarchy with two 'control' classes and the 'CalDistance()' method to calculate the distance between them. The class hierarchy and the specified constraints cause the backward propagation. In the example, if the up button is relocated to new position on the panel, the update should be propagated to the 'control_group' object, and it will recalculate the distance between the two buttons. We, therefore, can specify the constraint using the CONSTRAINT constructor:
CONSTRAINT distance_constraint
ON control_group push_button
AS CalDistance() >18 AND CalDistance() < 36
As described in Section 6.3, the specification generates triggers and a virtual class for the backward propagation. Figure 7-7 shows the HVC objects in the object diagram of the 'control_group' object.
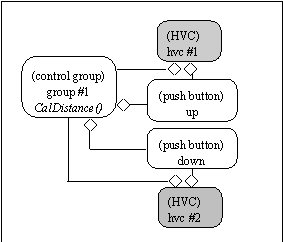
Figure 7-7 HVCs in the constraint specification
To support the backward propagation, the following trigger on the 'push_button' class is also specified from the above constraint specification.
CREATE TRIGGER constraint_push_button
AFTER UPDATE ON push_button
IF Call CalDistance() ON
Backward(HVC,control_group,obj).width>= 18 ...
EXECUTE INVALIDATE TRANSACTION;
3 ) A constraint on grouping controls
The constraint on grouping controls for channel selection in the example also can be verified with general triggers. An update of the target system in the 'push_button' class causes a trigger for checking the constraint on grouping controls. The following trigger, therefore, can specify the constraint.
CREATE TRIGGER group_constraint
AFTER UPDATE ON push_button
IF NOT(obj.belong = (SELECT * FROM system
WHERE id="channel"))
EXECUTE INVALIDATE TRANSACTION;
4 ) A design guideline
This constraint specification uses automatic invocation of preserved procedures supported by general triggers. When an update occurs in the target class, the specified trigger executes the preserved procedure to display the guideline without checking its condition clause. The following specification prompts the design guideline, when the display on the panel is updated.
CREATE TRIGGER guidelines
AFTER UPDATE ON display
EXECUTE CALL PrintMessage();
7.2.4 Integration of Applications
We use the CAD system in the constraint management system to design the features of each control. The designed features are translated into the design database and linked to a selected 'control' object as its shape information. After all the participating controls are translated, they are relocated on the panel to determine a proper layout.
Figure 7-8 shows that the designed feature of a push button (named rectangle_button) in the CAD system is translated into the design database through the CAD Database interface model. The translated feature information is linked to a 'push_button' object (the 'up' object) in the database (Figure 7-9). In this process, the dimension of the features is assigned to the corresponding attributes of the object. The following data manipulation assigns the width of the imported feature to the 'diameter' attribute of the 'up' object.
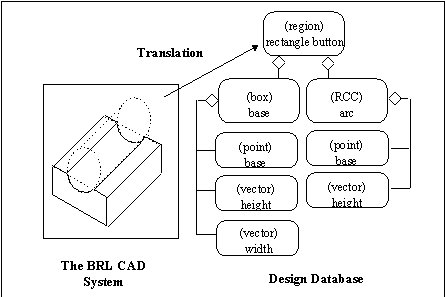
Figure 7-8 Translation of feature information
UPDATE push_button
SET diameter =(SELECT width FROM region
WHERE id ='rectangle_button')
WHERE id = 'up';
In this process if the imported feature does not satisfy the dimensional constraint on the 'push_button' class (see the 'push_button_cons' constraint in Section 7.2.3), the database prompts a warning message for the violation of the constraint. As a result, the designer who designed the shape of the push button is notified of the violation and redesigns the button before it is shared by other design applications.

Figure 7-9 Link feature information to the 'up' object
After all the controls are successfully designed and imported into the database (this means the controls satisfy the dimensional constraint specified in the database), another designer may use an application to relocate them on the control panel. Using this application, if the designer locates the 'up' and 'down' objects at a distance less than 16mm, the 'distance_constraint' constraint in the database rejects the transaction (the relocation operation). Figure 7-10 shows how the database checks the constraints and rejects the operation with a warning message.
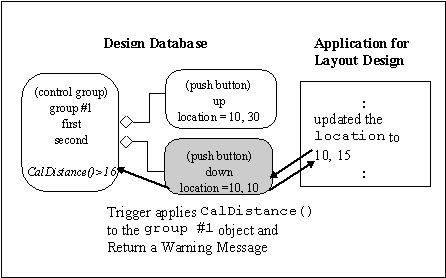
Figure 7-10 An example of the backward propagation
In the above design example, we show that all the applications including general CAD system for the feature design and the application for the control layout design can share the data and its constraints. In addition, even if the applications are independent from the ergonomic constraints, the information exchanged between them are enforced to satisfy the constraints in the database. The architecture we proposed, therefore, integrates engineering applications at the semantic level as we proposed.
Korean Engineering Databases ¨Ď copyright Namchul Do, 1996